Written Guides
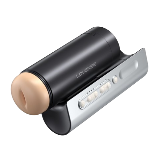
Lovense Webcam 2 Hardware Set Up
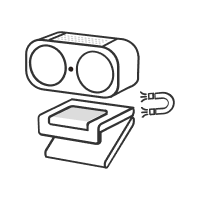
STEP 1
Attach your Webcam 2 to the magnetic mount (included).

STEP 2
Clip the mount onto your computer screen.
Note: there is a 1/4 inch screw hold at the base of the mount to connect a stand/tripod (not included).
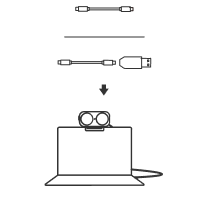
STEP 3
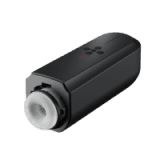
Connect the Webcam 2 to your computer using the USB cable (included). The green indicator light on the front of the camera will flash on once connected successfully.
Lovense Webcam 2 Software Set Up
A. Download Software
Please note: You must use OBS Studio to set up Lovense Webcam 2. After you have set up the webcam and activated your desired features, you may stop using OBS Studio if preferred.
Option 1: OBS Studio + OBS Toolset
For those using Lovense Cam Extension OR those who do not use Lovense Cam Extension/Stream Master:
Download both OBS Studio and OBS Toolset on your Windows PC or Mac. Once you download OBS Toolset, it will be integrated automatically into your OBS software.
Download here: https://www.lovense.com/cam-model/extension
Then open OBS Studio to get started.
Option 2: Lovense Stream Master
Download Lovense Stream Master which has OBS already built in.
Download here: https://www.lovense.com/cam-model/download
To open OBS, simply go to the "Home" tab and click the pink "Open Built-in OBS" button.
B. Set Up Lovense Webcam 2
Click the "+" button under the "Sources" tab and add "Lovense Webcam 2" as a new video capture device.
Gesture Control: Zoom In or Zoom Out (Optional)
In the OBS Lovense Webcam 2 Settings panel, click the "Advanced" tab and turn on both the "Gesture Settings" and "Zoom" toggles.
Then show your face and palm to the camera. When the webcam light flashes, the zoom feature is enabled. The camera will now respond to your hand gestures.
To zoom in:
1. Show the L gesture and your face to the webcam.
2. Move your hand up and hold.
3. The light will flash and the camera will zoom in.
To zoom out:
1. Show the L gesture and your face to the webcam.
2. Move your hand down and hold.
3. The light will flash and the camera will zoom out.
Enable Auto Framing (Optional)
The Auto Framing feature adjusts to keep your face centered at all times, even as you move around the camera frame. This feature supports single or multi-person framing.
In the OBS Lovense Webcam 2 Settings panel, click the "Advanced" tab and turn on both the "Gesture Settings" and "Auto Framing" toggles. You can use this feature with or without Zoom enabled.
Raise your palm when your face is in the frame. The camera will turn the Auto Framing feature on or off.
Note: There are two Auto Framing toggles - one under Gesture Settings and another under Other Settings.
· If the top Auto Framing toggle is on, it means you can turn auto framing on or off with your palm.
· The bottom simply shows whether Auto Framing is currently enabled or not (toggle on means enabled, toggle off means disabled).
Enable Virtual Camera
To finish setting up your webcam, click "Start Visual Camera" under the Controls panel. This will allow you to share your display with external sites or apps as described in the next section.
C. Connect to Livestream Site
Option 1: Livestream with OBS
If you want to livestream with OBS Studio, you can open the livestream site and select "OBS Virtual Camera" or "Lovense OBS Virtual Camera" from the dropdown menu.
Option 2: Livestream without OBS
Once you have set up your webcam and activated your desired features, you may stop using OBS Studio if preferred. Simply open the livestream site and select "Lovense Webcam 2" from the dropdown menu.
Note: On this interface, you can only use Auto Framing and Gesture Control as additional features.
D. Optional Features
*OBS Studio + OBS Toolset OR Stream Master Required
1) View Adjustment
Users can manually adjust the camera frame and then move freely within the frame.
Locate the Lovense Webcam 2 Settings panel in OBS Studio. Click the "View" tab, then move the green box around to change the frame, or use the slider to zoom in or out.
2) Set Your Audio Mode
In the OBS Lovense Webcam 2 Settings panel, click the "Advanced" tab and scroll down to the "Audio Mode" section. You can choose between:
· Voice Focus: Highlight the sound of your voice and minimize background noise.
· Noise Cancellation: Filter out nearby voices and background noise in busy environments.
· Music & Voice Balance: Balance the sound of your voice with external background music.
3) Set Your Display Color
Under the Lovense Webcam 2 Settings panel, select the "Effects" tab to adjust your camera display. Under the "Color Presets" tab, you can save different camera display settings. To save a new Color Preset, first adjust the display color as desired, then click "+" to name the preset and save.
4) AI Zoom
When AI Zoom is enabled, the camera will follow a selected target—either the body or the head—and adjust the frame accordingly. You can use this feature with or without Auto Framing.
· Half-Body: Sit in a chair and show half your body.
· Head: Sit in front of the camera with your face visible.
Note: The Full Body setting is not yet supported.
5) HDR
The HDR setting improves the color and contrast of your camera display. Enabling this feature will offer a more detailed and realistic video quality.
In the OBS Lovense Webcam 2 Settings panel, click the "Advanced" tab, scroll down to "Other Settings" and then turn on both "Camera Focus" and "HDR" toggles.
6) Remote Adjust (Mobile Control)
You can also control Lovense Webcam 2 using the "Remote Adjust" feature via your phone.
In the Lovense Webcam 2 Settings panel, click the "View" tab and then click "Remote Adjust" to view the QR code.
Scan the QR code with either the Lovense Connect app (2.8.6 or newer for iOS and 3.0.2 or newer for Android) or your phone camera.
Please make sure your mobile and PC are on the same Wi-Fi network.
After scanning the QR code, you will be able to see the remote adjust panel in your mobile browser or Lovense Connect app.
Via the mobile interface, you can easily:
1) Enable or disable Auto Framing.
2) Add Preset Positions to automatically switch camera positions when users tip the required amount. Click the "+" button to add a new position. Next, enter the desired tip amount and zoom duration.
3) Use the View Adjustment panel to manually adjust your camera. Use the slider below to zoom in or out.
Click the gear icon to view advanced settings.
· Under the "Advanced" tab, you can enable AI Zoom, Gesture Settings, or HDR.
· Under the "Effects" tab, you can adjust the display color or save different display settings under "Color Presets".
E. Tip-Activated Features
*Lovense Cam Extension OR Stream Master Required
Models can preset different camera positions in OBS via the "Tip-Activated Functions" section. Once a viewer tips the required amount, the camera will zoom in or out accordingly.
Add a New Position
First, adjust your camera via the View Adjustment panel (e.g. you can focus on a desired body part or zoom in on your face). Once you have your desired position, click the "+" button next to "Preset Position" and enter your desired token amount and zoom duration. Next, click the "OK" button.
Connect to Lovense Cam Extension
a) Log into Lovense Cam Extension.
b) Click your desired cam site tab, click the "Video Feedback" tab, and then click the toggle next to "Video Feedback Configuration".
Send a Test Tip
Go to your broadcasting page and send a test tip via the Lovense Widget to check if your tip-activated feature is working.
Lovense Webcam 2 will zoom in or out to the preset position.
The camera frame will return to the default position after the zoom duration ends.